Where do I begin? I guess I’ll just make this short and to the point. I started to many things at once and this got lost in the shuffle. I forgot about it once the holidays hit, and frankly, just needed a break from it all.
I’m back now and ready to go.
Lately, we’ve been trying to get everything ready for the upcoming holiday season. Once again there is a million things we want to do and they’re probably won’t be enough time.
So far I’ve repainted a Grand Venture Santa I found in trashand a General Foam Joseph from the same pile.
From nativity to wizardry
As you can tell both pieces were completely overhauled. I tried giving the Joseph away for over a year and nobody wanted it. I’m assuming because of it conditions. Both Santa and Joseph were in a fire, smoke damaged and covered in who knows what.
I wanted something for Hallowen, so I turned the Joseph into a wizard. I. Going to make him a crystal ball out of an old plastic fishbowl, painted white, with lights on the inside.
The Santa is a gift to my daughter. She’s only 8 so I don’t think she gets how much it means to me to have done this for her. I went with a bubble gum theme for this. I used her 3 favorite colors: pink, teal, and grey. Which is perfect because it’s just the colors of the Santa muted. I’m going to try him with a black light whenever I get one.
Another Halloween mold I made is a custom pumpkin solider. I s older the idea from Lighthearted Halloween on Facebook. I used a the bodies of Union Plastic Soldiers and Trendmaster Jack O Lanterns. I’ve completed one and still waiting for another pumpkin head for the other.
Good ol Jack
That’s pretty much a quick run through of the past few weeks. Have a alien space craft to get done and tie up some other odds and ends, trick or treat will be here in no time!
This is just a short and sweet update on our newest molds!
This was my first brand new mold ever! Man, was I disappointed. The paint job is terrible. I let General Foam know, we will see what happens. I got it for a great deal on Kmart.com so Im not too mad.
My wife picked up this sweet little lot today for me! I don’t know why but those plastic melted popcorn are starting to really grab my eye! The little pumpkins with the holes on top went to a tiki torch! I haven’t been able to find a picture of one yet though.
This is a pretty sweet group! The pumpkin stack is my first ever Don Featherstone mold! The large Mary, Joseph, Shepherd, cow, lamb,donkey were all given to me by a guy at work! The small Mary and Joseph were bought with the pumpkins and orange pail. We got the purple pail for free and bought the two skeletons for $6! We plan on spraying those with glow in the dark paint before hanging them in our Dogwoods.
I’ve been putting this off because I already have about 2 dozen hours invested in this repaint and still have probably at least one more.
Looking back, I just realized I repainted all 4 molds i got in the $10.00 lot. I’m a little upset someone snagged the small snowman before me, but I think I still got 4 solid pieces! Now they should all be good for another 35 years!
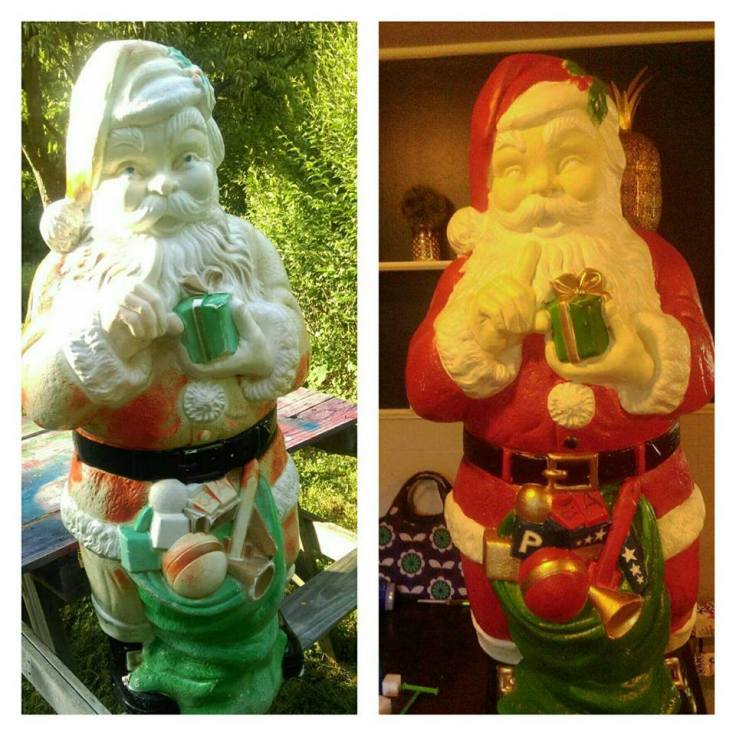
I wanted him to be restored to his former glory.
VINTAGE 48″ POLORON SANTA
The Restoration
1. Strip the mold.
This is absolutely my least favorite part. It smells, the stripper burns if you’re not careful, its almost reverse progress. But it has to be done!
I’ve heard other people use different brand strippers and I’ve seen people who even use oven cleaner. I guess you just find what you like and are comfortable with.
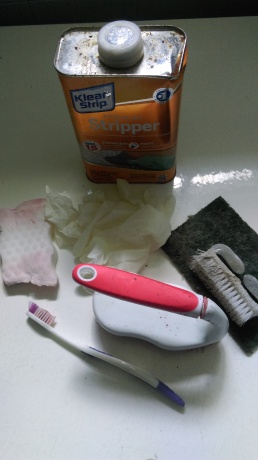
This is pretty much my strip kit minus rags (i just use old shirts) and a hard plastic bristle brush I seemed to have misplace.
Holly Jolly Vintage Strip Kit
Kleer Strip
Magic Eraser
Emery Pad
Scrub Brushes of different sizes
Latex gloves
Rags
Ammonia
Water
In a well ventilated area wash your blow mold with ammonia and a scrub brush. This will get a lot of the dirt off and some of the loose paint. Allow the mold to dry.
Also, while in a well ventilated area apply a coat stripper to a small area of blow mold. I usually do about a 12″x 12″ section. Be careful not to leave the stripper on to long and melt the plastic. I’ve never had any problems melting the plastic with Kleer Strip,but I’m sure if you left it on too long it could happen.
After you spend a billion hours getting the paint off ,sometimes you’re left with a tinted plastic or “blush”. This is where you use your Magic Eraser, the eraser will get you to a nice white base.
Before moving on to the painting I wash the mold with dish soap to remove any residue and then again with ammonia. This will allow the tape and paint to stick.
I had a really neat time lapse of this but I cant find it.
Some of the paint would just not come off!
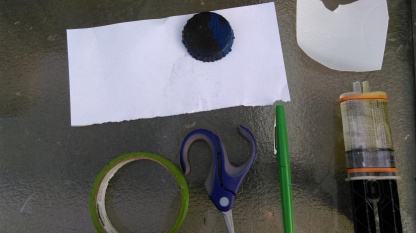
Fill and patch holes
I had few holes and cracks to patch and fill.
Heres what I did!
Epoxy
Hot Glue
Replacement plastic (I used a milk jug)
Tape
Marker
Crayon
Paper
For the boot, Santa’s sack, and the crack in his eyebrow I just used hot glue. I applied the glue and once cooled I heated up a spoon to smooth it out. The hole on the boot wasn’t that noticeable to begin with, otherwise I would have patched it like the horn.
PATCHING THE MOLD
This was the first mold I had to patch and I sort of just winged was it.
This went way better than I had expected.
The first thing I did was take the paper and do a “grave rubbing” of the hole with the crayon and paper. Then I cut out the paper and traced it onto the plastic and cut out the plastic. I used a piece of the milk jug that had a bit of a fold on it so that worked really well.
Next step was to fasten the patch to the mold. I taped the edges of the plastic and mixed and applied the epoxy. I then placed the patch over the hole and let dry. After it dried I filled in a couple small holes with epoxy and smoothed it over with hot glue.
As you can see in the image of the stripped mold, it turned out fairly well. Once everything is patched and filled
Tape the Mold
Frog tape
Masking tape
Magazine/ Newspaper
Xacto Knife
Scissors
This is almost as bad as stripping the mold but at least you are getting close to seeing progress!
I generally start by painting the shade that covers the most area. In the case of this Santa it was obviously red. I use Frog Tape on the edges following the shape of the Blow Mold. Cutting away excess tape with the Xacto knife. I fill in the areas I can with newspaper and magazines. I wish I would have had masking tape to hold the paper to the Frog Tape , but I was excited to finally get paint on him, so I just used what I had.
Ready for Red
Time to Paint
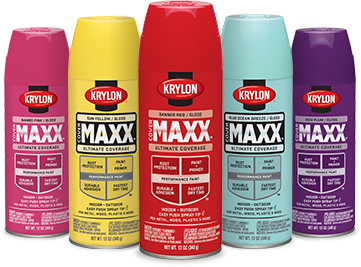
Paint
I use Krylon Maxx Spray paint, again this is personal preference .
After each coat put the light in the mold and check for runs and bare spots. You would be surprised what you would miss when not lit up. If you think. the paint is too dull add another coat. If you have runs, I just strip the paint from that section (very carefully),clean the area and repaint.
Let each coat and color dry entirely before moving onto the next color.
I wanted to keep most of him as original as possible.
Some changes i did make were.
I colored the belt loops red
I did not give him the gold beard
I placed a” P” on a block for my last name
The Plane went from red and gold to red,white, and blue with stars. USA!
So, I didn’t abandon this blog or Holly Jolly Vintage. In the process of trying to expand it.
I’m trying to think back of all the new stuff we’ve gotten since my last post and my mind just keeps going back to the best week of the summer.
We snagged most of these molds in one trip after I searched “Santa’s sleigh” on Craigslist. She called them “plastic statues that light up”and I think really just wanted to get rid of them. We grabbed 10 candles ,2 cows, lamb, donkey,camel, Mary, Joseph,Jesus, 2 different angels,4 bears, 3 wise men, shepherd,shepherd boy,penguin, a Santa, a reindeer and the small joy bear. $75.00. It was definitely our biggest haul so far.
Earlier in the week we grabbed the Jack O Lantern for $3. My wife got the snowman, soldier drummer, and a TPI Santa all for $10 from a BST site on Facebook .
We decided since I was off, we should hit the Lincoln Highway yard sales. I wasn’t expecting much after the score we had a couple days before but I’m glad we went! We got another TPI Santa and “Coca Cola Bear” for a dollar a piece . We also got a box of the small Halloween lights, a pumpkin bucket and blow mold popcorn for another $5.00! I don’t collect inflatables but for $5.00 I couldn’t pass up the snow globe! My favorite of that day is the NOEL light post for an astounding 50 cents!
I finally finished the Poloron Santa and will be putting the tutorial together as soon as I’m done with this post.
We also repainted two candles for Halloween.
The top left is how we got the candles. We got them in a lot with the Poloron Santa and a couple of other things. The bottom left was a botched repaint attempt. In our defense , it was winter and cold outside. The tape wouldn’t stick and it was our first ever attempt at a repaint. I’m still torn on the skulls to fill the holes or if i should wait a bit longer and see what other options i have. I have two candles from the large haul that are cracked so im repainting them for Halloween as well. I’m going to do a candy corn paint job with cauldrons on top.
…or rather we got our puppy a new puppy! MAXIMUS“MAX”SANTA CLAUS.
Aside from that not much to report on. Yard sales are all running dry and its getting too hot for auctions. We did manage to score a set of 22″ Beco Choir singers from an auction. I snagged them for $5.00 for the pair. I ended up really not wanting them so I tried making a trade. Long story short, I ended up getting greedy and didn’t feel right about it so I gave them away.
Last weekend we went molding and came up empty for the most part. We saved a Union injection molded tree from the landfill and rescued a General Foam trick-or-treat pail from a roadside ditch!
General Foam Pail
Union Injection Mold Tree
The weekend wasn’t a complete bust,I was able to find some Sun Hill eggs for .10 each at a sale. They also had 2, 8 ft airblown inflatables , Santa and a snowman. I got those for $5 for the pair. The Santa blows up perfectly,but I’m still having trouble with the snowman. If anybody has any tips on getting it to blow up id appreciate them.
I’ve still been working on that Poloron Santa when I have a chance. I’m getting really close to being done and putting together a blog post about that. I cant wait to start on the candles for Halloween, I think theyll look really neat.
Quick update on the Poloron Santa. It has been a far bigger undertaking than I had expected. Poloron made something fierce when it designed its burnt red paint. Ive already gone through 1.5 qts of Kleen-Strip, about 20 rags, 25 pairs of gloves, 100 gallons of water and I’m still not done. Its definitely been overwhelming to say the least. I still have holes to fill,pieces to fabricate and then paint. Ill get him restored to his former glory but now it just feels like that tunnel is getting longer. I’m starting to get antsy thinking about all the stuff I have to do for halloween stlll and thats only a few months away! (120 days as of today!)
We have two candles we plan on repainting, both black, one with green melting wax the other with purple . We are going to use pumpkin pails as toppers. The flames are going to be used on two Empire candles we found online that came with out flames!
Early 70s Empire Noel Candles,no flames
Those come from a pretty cool story too! So I was looking at a BST site and on one of the photos I saw a TPI Santa with deer mold. I asked if it was for sale and the seller responded with “its just a large plastic Santa”. YES! I also spotted a glimpse of a TPI Polar Bear, both in pretty good shape. She said $10, I set up a meeting!
TPI Santa with Deer
TPI “Coca-Cola” Bear
I got a message not long after from the seller I was anticipating a research retraction,nope she offered the candles too for another $5! I couldn’t pass them up.
Earlier in the day, I found 20 light up ornaments for sale. They wanted $4 a piece and there was no way I could justify that,plus it was a bit of a drive . I kicked it around until the seller messaged me and said they would make me a deal! I ended up getting them for $2 a piece. Needless to say, I took all 20! We also managed to snag a General Foam Jack-o-Lantern for another $2 at another sale!
Generic light up ornaments.
Generic Light up ornaments
General Foam Jack O Lantern
Also,We had our first auction win. A pair of Beco choir singers. I really dont have anywhere for them in my display. I might sell them but I would ultimately like to trade them for a Mrs.Claus and North Pole sign.;).
Oh, its not a lot but our 1st..
INDEPENDENCE DAY
….display!
HAPPY 4th of July!
Generic flamingos, Empire toy soldiers , and a cameo of our boxer Roxanne!
We have decided it would be more beneficial for us to strictly use this as a place to share our ever growing collection of Blow Molds! We are pretty new collectors and fell in love pretty instantly. We will from time to time touch on other nostalgic holiday decor,but rather than be a jack of all trades,we wanted to master one.
So, to keep you up to date here is pretty much whats been going on with our collection!
Friday we went “Blow Molding”, we hit a couple yard sales before deciding to hit a Goodwill Outlet. The one closest to us is an hour away, we’ve never been so we didn’t know what to expect. For the most part it was like an indoor rumage sale, just less organized. They did have a small section with Christmas decorations. They had a couple of 3d wireframes ,two holographic trains,a few trees, and one 1995 Empire wreath!
The bow is all there,just was getting dark when I started taking pics and couldnt see the mold without a flash!
We ended up also finding three Jack-O-Lantern pails I’ve been hoarding for an arch. The pails were .76/lbs and came out just under a pound. The wreath was a whole $3.00 and now I need another before Christmas! The entire haul –> $3.74 .
L->R :Back Row: General Foam Pail, General Foam Pail, Empire Pail. Front Row: Empire Wreath.
Saturdays were spent at work for me while Holly went to a few more yard sales. No luck. 😦
I did however get a Facebook notification that one of my keywords has popped up in a BST site. I usually am disappointed but this time…JACKPOT! 4 miniature molds for $10.
I really wanted to wait and not let the cat out out of the bag. I tried to contain my fanaticism and play this on a level field. But, I’ve decided to just jump in and share my first vintage Christmas love.
Blow Molds. I’m not sure what it was about them, I didn’t grow up with them, I didn’t know anyone that had any. In fact, I thought they were tacky.
One day last summer, I was browsing the local Facebook BST site and somebody had a Poloron snowman for sale. I didn’t buy it but it really got me interested. I joined a couple of groups on Facebook and started looking for molds on craigslist and at thrift stores. In hindsight I wish I would’ve bought that snowman.
The snowman for sale looked no where near as nice as this one!
Halloween rolled around and I still hadn’t found a blow mold to call my own. A couple people on one of the groups were finding General Foam Black Cats and Scarecrows at Wal*Mart. We looked at 5 or 6 different locations one night and still didn’t find one!
We did end up recently finding an original Black Cat O Pumpkin at a yard sale!
A few weeks went buy and I told my mom, to keep an eye out when she was at the auction for them. Of course, I had to explain to her what they were. Well, it paid off because, she had one in her basement! It came in a lot she had bought and she wasn’t sure what to do with it. I was pumped! I was now the owner of an Empire ghost, a blow mold!
I bought a couple of pumpkins from a lady on the BST site and that was pretty much my display last year!
I did eventually find my first Christmas mold in early November at a Goodwill. It was a waving Santa. I’m not sure why, but I never really researched it so I don’t even know the maker! So far, we ‘ve collected somewhere between 15-20 molds. The neat thing is for the most part you can easily repaint them and most collectors wont mind! So far we’ve repainted two, a 1971 Empire Santa , and an Empire snowman (one just like the Poloron I first saw!)
I wanted to paint him so he could stay out and cheer on my Penguins in the SCF!


 This is a pretty sweet group! The pumpkin stack is my first ever Don Featherstone mold! The large Mary, Joseph, Shepherd, cow, lamb,donkey were all given to me by a guy at work! The small Mary and Joseph were bought with the pumpkins and orange pail. We got the purple pail for free and bought the two skeletons for $6! We plan on spraying those with glow in the dark paint before hanging them in our Dogwoods.


")


 .
.